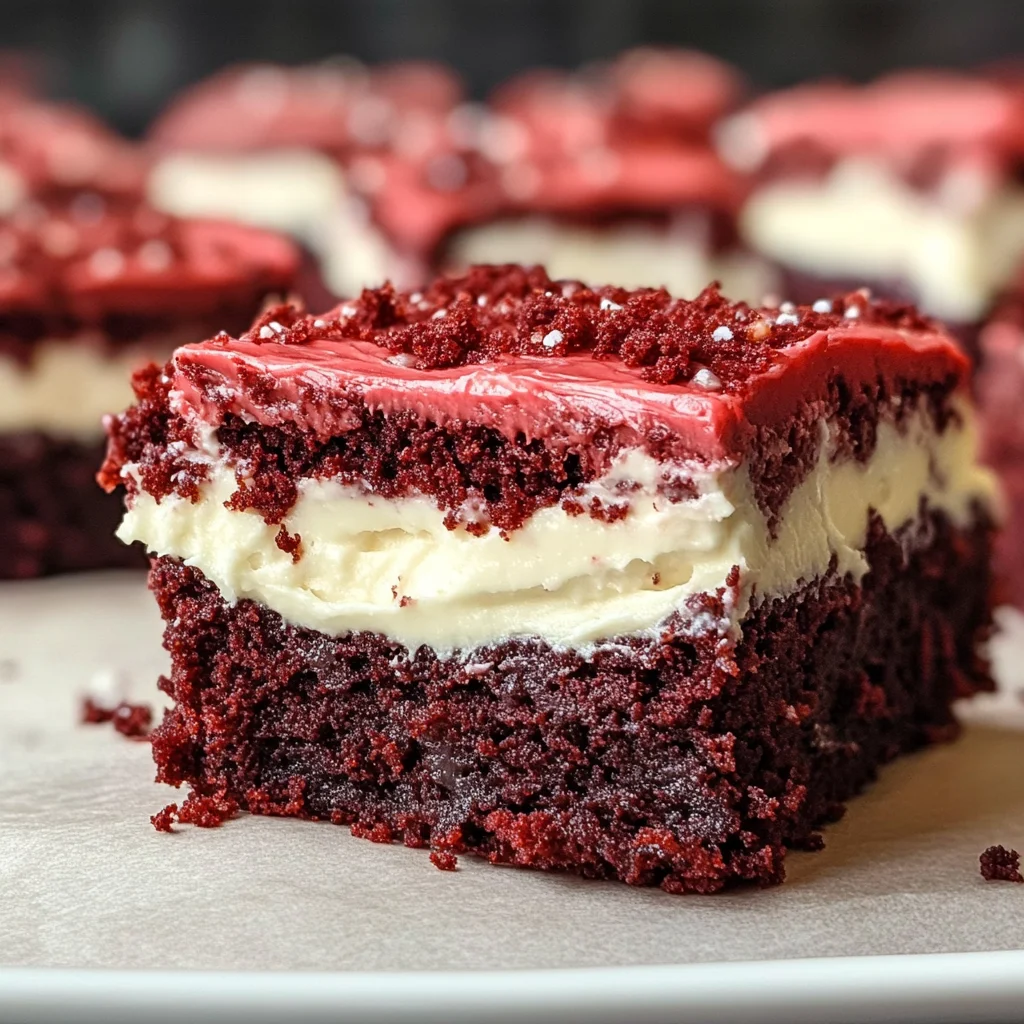
Red Velvet Brownies
These Red Velvet Brownies are a delightful treat that combines the rich, velvety flavor of red velvet cake with the fudgy texture of brownies. Topped with a creamy layer of frosting, they are perfect for any occasion—whether it’s a birthday party, holiday gathering, or simply a sweet indulgence at home. You can even make them dairy-free, catering to various dietary needs while still delivering on taste!
Why You’ll Love This Recipe
- Decadent Flavor: The unique taste of red velvet combined with the richness of chocolate creates an irresistible dessert.
- Creamy Topping: The cream cheese frosting adds a luscious finish that complements the brownies perfectly.
- Easy to Make: With straightforward steps, you’ll have these brownies ready in no time!
- Versatile: Great for parties, potlucks, or just an everyday treat; they suit any occasion.
- Dairy-Free Option: Easily adapt this recipe to be dairy-free without compromising flavor.
Tools and Preparation
To make your baking experience smooth and enjoyable, gather the necessary tools before you start. Having everything ready will help you focus on making delicious red velvet brownies.
Essential Tools and Equipment
- 8×8 square baking pan
- Parchment paper
- Medium mixing bowl
- Whisk
- Spatula
- Toothpick (for testing doneness)
- Standing mixer (optional)
Importance of Each Tool
- Baking Pan: A square pan ensures even baking and makes cutting the brownies into squares easy.
- Parchment Paper: Helps prevent sticking and allows for easy removal of brownies from the pan.
- Whisk: Essential for combining ingredients smoothly and achieving a consistent batter texture.
- Spatula: Perfect for scraping every bit of delicious brownie batter from the bowl.
Ingredients
These chewy red velvet brownies are topped with the best cream cheese frosting! Plus, you can easily make these red velvet brownies dairy-free so they’re perfect if you have food allergies!
Ingredients:
– 3/4 cup butter, melted (regular or dairy free)
– 3/4 cup light brown sugar
– 1 cup granulated sugar
– 2 eggs
– 1 tbsp vanilla extract
– ½ teaspoon liquid red food coloring (SEE NOTES)
– 1½ teaspoon white vinegar
– ¼ cup cocoa powder
– 1/4 tsp salt
– 1 cup + 3 tbsp all-purpose flour (SEE NOTES)
– 4 oz plain cream cheese, room temperature (SEE NOTES IF DAIRY FREE)
– ¼ cup butter, softened (dairy free or regular)
– ½ teaspoon vanilla extract
– pinch of salt
– 1½-2 cups powdered sugar (icing sugar)
– 2 Tablespoons cornstarch (ONLY IF DAIRY FREE, SEE NOTES)
How to Make Red Velvet Brownies
Step 1: Preheat the Oven
Preheat the oven to 350°F and line an 8×8 square baking pan with parchment paper. Ensure that some parchment paper hangs over the sides for easy removal later.
Step 2: Prepare the Butter Mixture
Melt the butter in the microwave or over low heat on the stove. Pour it into a medium-sized bowl.
Step 3: Combine Sugars and Butter
Add both sugars to the melted butter. Use a whisk to combine until it forms a paste that pulls away cleanly from the sides of the bowl.
Step 4: Add Eggs and Flavorings
Beat in the eggs one at a time, then add white vinegar, vanilla extract, and red food coloring. Mix well until fully incorporated.
Step 5: Incorporate Dry Ingredients
Pour in cocoa powder, salt, and flour. Gently mix with a whisk until just combined—this should take about one minute.
Step 6: Transfer Batter to Pan
Use a spatula to pour the batter into your lined baking pan, ensuring all batter is removed from the bowl.
Step 7: Bake Brownies
Bake for 30–40 minutes. Start checking at 30 minutes by inserting a toothpick in the center. The top should be crinkly with only a few wet crumbs on your toothpick when done.
Step 8: Cool Before Frosting
Allow brownies to cool completely before proceeding to make your cream cheese frosting.
Step 9: Make Cream Cheese Frosting
In another bowl or using a standing mixer, beat together cream cheese, softened butter, salt, and vanilla extract until smooth. Gradually add powdered sugar until desired consistency is reached. If using dairy-free cream cheese, include cornstarch for thickness.
Step 10: Frost Your Brownies
Once cooled, frost your brownies generously with cream cheese frosting.
Enjoy your homemade Red Velvet Brownies, perfect for sharing—or keeping all to yourself!
How to Serve Red Velvet Brownies
Red velvet brownies are a delightful dessert that can be served in various creative ways. Here are some serving suggestions to elevate your experience with these chewy treats.
A La Mode
- Serve warm red velvet brownies with a scoop of vanilla ice cream on top. The creamy ice cream pairs perfectly with the rich brownie flavor.
With Fresh Berries
- Add a side of fresh strawberries or raspberries. The tartness of the berries complements the sweetness of the brownies beautifully.
Drizzled with Chocolate Sauce
- For an extra indulgent treat, drizzle warm chocolate sauce over the brownies. This adds a rich layer of flavor that chocolate lovers will adore.
Topped with Whipped Cream
- Lighten up your dessert by adding a dollop of freshly whipped cream. This adds a fluffy texture that contrasts nicely with the dense brownies.
As Mini Brownie Sundaes
- Cut brownies into small squares and layer them in cups with ice cream, toppings, and sauces for individual mini sundaes.
With Coffee or Tea
- Pair your red velvet brownies with a cup of coffee or tea. The warm beverage enhances the flavors and makes for a comforting dessert experience.
How to Perfect Red Velvet Brownies
Creating perfect red velvet brownies is all about attention to detail. Here are some tips to help you achieve brownie perfection every time.
- Use Quality Ingredients: Opt for high-quality cocoa powder and food coloring for vibrant color and rich chocolate flavor.
- Don’t Overmix: Stir just until combined when adding dry ingredients. Overmixing can lead to tough brownies.
- Watch the Baking Time: Start checking for doneness at 30 minutes. Remove them when they have a few wet crumbs on the toothpick for that ideal fudgy texture.
- Cool Completely Before Frosting: Allow your brownies to cool fully before adding frosting; this prevents melting and ensures clean layers.
- Experiment with Food Coloring: Adjust the amount of red food coloring based on your preference for color intensity; feel free to add more for vibrant results.
- Store Properly: Keep leftovers in an airtight container in the fridge to maintain their freshness for several days.
Best Side Dishes for Red Velvet Brownies
Pairing side dishes with red velvet brownies can enhance their enjoyment. Here are some delicious options to consider:
-
Vanilla Ice Cream
A classic pairing, vanilla ice cream balances the sweetness while offering a creamy contrast. -
Chocolate Mousse
Rich and smooth, chocolate mousse complements the brownie texture without overwhelming it. -
Fruit Salad
A light fruit salad provides refreshing flavors that cut through the richness of the brownies. -
Pecan Pie Bites
These bite-sized treats add crunch and sweetness, making them an exciting side option alongside moist brownies. -
Cheesecake Bites
Small cheesecake bites offer creamy goodness that pairs well with red velvet’s flavors. -
Coffee Cake Muffins
A slice of coffee cake muffin enhances morning coffee breaks while complementing dessert flavors beautifully. -
Caramel Sauce
Drizzling caramel sauce over the plate creates an elegant presentation while adding sweetness and richness. -
Milkshake
A thick milkshake blends perfectly as a drink option, providing an indulgent experience alongside your decadent brownies.
Common Mistakes to Avoid
Making red velvet brownies can be simple, but there are common pitfalls to watch out for.
- Using the wrong type of food coloring: Not all food colorings are created equal. Liquid food coloring may not yield the vibrant red you desire. Consider using gel food coloring for a more intense hue.
- Overmixing the batter: Mixing too much can lead to tough brownies. Mix until just combined for that perfect chewy texture.
- Ignoring baking time: Each oven is different, so start checking your brownies at 30 minutes. They should be slightly underbaked for a fudgy texture.
- Forgetting to cool completely before frosting: If you frost warm brownies, the frosting can melt and slide off. Let them cool completely for the best presentation.
- Not measuring ingredients accurately: Baking is a science, so use a kitchen scale or measuring cups to ensure accuracy. This can greatly affect the final texture and taste of your brownies.
Storage & Reheating Instructions
Refrigerator Storage
- Store your red velvet brownies in an airtight container.
- They will stay fresh in the fridge for up to one week.
Freezing Red Velvet Brownies
- Wrap individual brownies in plastic wrap or aluminum foil.
- Place them in a freezer-safe bag or container for up to three months.
Reheating Red Velvet Brownies
- Oven: Preheat to 350°F and heat for about 10 minutes until warm.
- Microwave: Heat one brownie on a microwave-safe plate for about 15-20 seconds.
- Stovetop: Use a skillet on low heat, covering it with a lid, and warm for 5-7 minutes.
Frequently Asked Questions
How do I make these red velvet brownies dairy-free?
You can easily swap regular butter and cream cheese with their dairy-free alternatives. Look for plant-based options in stores.
Can I add nuts or chocolate chips?
Absolutely! Feel free to fold in chopped nuts or chocolate chips into the batter before baking for added texture and flavor.
How do I achieve that perfect cream cheese frosting?
Make sure your cream cheese is at room temperature before mixing. This ensures a smooth consistency without lumps.
What can I substitute if I don’t have cocoa powder?
You can use carob powder as a substitute, but keep in mind it will change the flavor profile slightly.
Final Thoughts
These red velvet brownies are not only visually stunning but also incredibly delicious! With their rich flavor and creamy frosting, they are perfect for any occasion. Don’t hesitate to customize them with your favorite mix-ins or toppings, making them uniquely yours! Try this recipe today and enjoy a delightful treat that everyone will love!
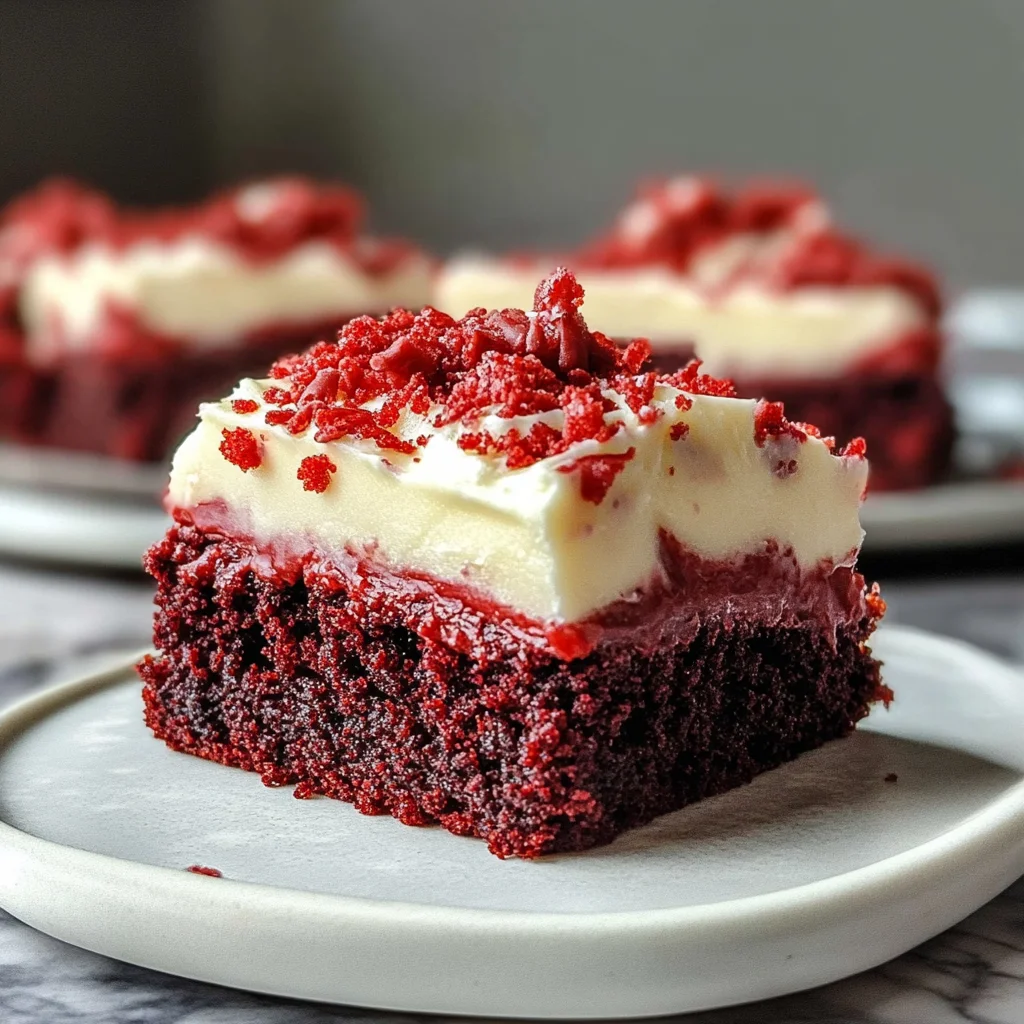
Red Velvet Brownies

Indulge in the delightful world of Red Velvet Brownies, where the luxurious taste of red velvet cake meets the gooey texture of rich brownies. Topped with a velvety cream cheese frosting, these brownies are perfect for celebrations or as a sweet treat at home. Whether you’re catering to dietary preferences with a dairy-free option or simply craving something special, this recipe offers everything you need for an irresistible dessert. Easy to make and incredibly versatile, these brownies can be served warm with ice cream or paired with fresh berries for a refreshing twist. Experience the joy of baking with these chewy red dessert bars that will surely impress family and friends!
- Prep Time: 15 minutes
- Cook Time: 35 minutes
- Total Time: 50 minutes
- Yield: Approximately 16 servings 1x
- Category: Dessert
- Method: Baking
- Cuisine: American
Ingredients
- 3/4 cup butter (regular or dairy-free)
- 3/4 cup light brown sugar
- 1 cup granulated sugar
- 2 eggs
- 1 tbsp vanilla extract
- ½ tsp liquid red food coloring
- 1½ tsp white vinegar
- ¼ cup cocoa powder
- 1 cup + 3 tbsp all-purpose flour
- 4 oz plain cream cheese (dairy-free option available)
Instructions
- Preheat oven to 350°F and line an 8×8 pan with parchment paper.
- Melt the butter in a bowl; mix in both sugars until well combined.
- Beat in eggs, vanilla, vinegar, and food coloring until smooth.
- Gradually add cocoa powder and flour; stir until just combined.
- Pour batter into prepared pan and bake for 30–40 minutes, checking doneness with a toothpick.
- Let cool completely before frosting with cream cheese mixture.
Nutrition
- Serving Size: 1 serving
- Calories: 240
- Sugar: 26g
- Sodium: 160mg
- Fat: 12g
- Saturated Fat: 7g
- Unsaturated Fat: 5g
- Trans Fat: 0g
- Carbohydrates: 32g
- Fiber: 1g
- Protein: 3g
- Cholesterol: 30mg